Safe and secure storage with Linux
In this article I will play with software RAID mdadm in Linux. The goal is to learn how to create reliable RAID storage on Linux. I will create a RAID here, manage full disk encryption for it, show how recovery is working, grow the RAID adding a new device, install BTRFS on top of mdadm RAID and LUKS to store the data safely and securely.
Following the article of Jeremy Messenger I have decided to write an update to it mainly for the sake of compatibility with new software versions.
Disclaimer On this web site you might read about
or get access to various kinds of software and technology, including but not limited to libraries,
operating systems, software for communications, mobile phones and tablets,
Android software and Linux, even cars and motorcycles, security and penetration testing software,
software used in security research and forensics, some samples of software which can be
used (elsewhere) for malicious or illegal purposes. You will read about or be provided with
the ways to change it, to operate it and to use it. You might find advice and recommendations,
which are only an opinion, and not a legal advice or commercial recommendation..
Bear in mind, please, that everything you do, you do solely at your own risk
and responsibility. In no way the author of this web site, information, graphics
and other materials presented here or related to it can be made liable or
anyhow else responsible for your own actions as well as
actions of any third party and their direct or indirect results or consequences
with or without the use of this information as well as the software,
technology and systems mentioned and/or presented here,
no matter if developed by the author or by any third party.
In no way it is guaranteed that you will meet any suitability for
any particular purpose, safety, security, legality or even simply
functioning of the software and systems described here. You have to make
sure each time yourself, whether what you do, is really what you intend to
do, and that you are ready to be yourself responsible for. All the recommendations
and experiences described here are the opinions of corresponding authors and
are to be taken with care and own full responsibility.
The software provided
on or through this web site, linked to from this web site or anyhow else
related to this web site is provided by the corresponding authors on their
own terms. We provide all the software here as is without any guarantees to you.
You are responsible for deciding whether it is suitable for you or not.
You are also responsible for all direct or indirect consequences of using this
software.
Other web sites linked to from the current one are out of the author's control,
we can not guarantee anything about their content, its quality or even legality. We
can not be liable for any use of the linked to web sites or of the information presented there.
We reasonably try to keep this website running smoothly and to deliver
information to the best of our knowledge corresponding to the state of the art at the times
when the information is composed, usually presented together with the information, and out of good intents.
We can not however guarantee and can not be liable for this website being temporarily or permanently
unavailable, presenting unreliable information or software, or any other similar or not malfunctioning
or functioning not up to your expectations as well as any consequences
which might result from this site's operation.
We will play here with loopback devices, virtual block devices created from files, instead of real devices.
To finish the experiment I intentionally corrupt one of the drives and see what happens on the file system level up on the stack.
Plan - Technology Stack
Here I sketch the target stack we are going to build in the course of this long article. Let me represent it to you in a table where rows correspond to abstraction layers and go from the user file system down to devices.
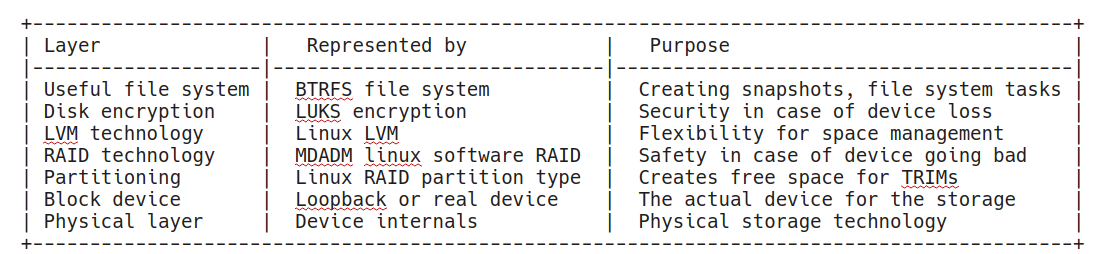
Table 1. Technology Stack
We will construct these layers bottom up.
The physical layer will be represented by files in the /root/devfiles/ directory. We will mount loop devices on these files to replace actual drives and emulate block devices. Real devices like /dev/sdX shall be used instead of /dev/loopX devices in a practical setup.
The block devices are partitioned and the partition occupies 90% of space. I do this to reserve some space for TRIM and over-provisioning.
RAID technology uses partitions on the drives. I will spell it lowercased as "raid" below. An ability to replace a failed drive without data loss is targeted using the raid technology.
On top of the raid comes LVM, we use it to flexibly glue many raids together and allocate space for logical volumes flexibly across the raids.
A layer of disc encryption comes next. It is useful in the case of the device landing in the wrong hands. LUKS will scramble our data and it will be hard to read out for an attacker.
Finally we top up the stack with BTRFS for basic functionality of a file system with snapshots.
Please, note, that the stack above is an example stack we choose for demonstration purposes. There are many ways to achieve the same outcome. For instance, LVM supports RAIDs too, BTRFS supports snapshots and raids, LUKS could be moved down the line towards physical device for higher security, there is ZFS supporting most of the features too, etc.
We do not really consider here booting from the resulting device. Nothing prevents it in theory, but we do not go into it here. The device we create is a reliable secure big long-term storage by design rather than the /boot partition.
Creating Loop Devices
The loop devices will take the image files and convert them into block devices for us.
I'll work as root below, do it at your own risk, especially on operations like dd (disk destroyer) and fdisk (spell it yourself).
Let's create a couple of files to carry the device information:
mkdir /root/devfiles
cd devfiles
dd if=/dev/zero of=sd1.img bs=1M count=512
dd if=/dev/zero of=sd2.img bs=1M count=512
Now we have two images which will carry the contents of two devices, I call them sd like SD cards for no specific purpose. You can call them whatever you like.
root@test:~/devfiles# ls -s
total 1048592
524292 sd1.img  524300 sd2.img
Two files of 512 megabytes have been created.
Using losetup we can create virtual block devices now. They will "convert" the files to devices for us.
losetup -fP sd1.img
losetup -fP sd2.img
The -f argument stands for take the next available /dev/loop* device.
The -P argument enables kernel to re-read a new partition table once it is created. It will save a partprobe call after fdisk in the next step.
Let's check up on the results:
losetup -a
/dev/loop1: [64768]:43272 (/var/lib/snapd/snaps/core_4917.snap)
/dev/loop2: [64768]:133783 (/root/devfiles/sd1.img)
/dev/loop0: [64768]:2382 (/var/lib/snapd/snaps/core_6130.snap)
/dev/loop3: [64768]:133784 (/root/devfiles/sd2.img)
I have /dev/loop2 and /dev/loop3 mounted to my files. Snapd apparently used a couple of loop devices prior to my experiment. I will skip them from listings below.
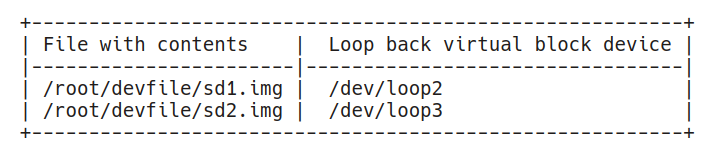
Table 2. Loop Devices
Note: I use here 'losetup -a' some might find the output of 'losetup' without -a more useful, try it.
Before enrolling the devices into a raid we will partition them.
Partitioning
It is a good practice to double-check the device to partition before the actual damage is done if a wrong device is selected or in a case of another mistake.
Let's check the existing partition table first:
root@test:~# fdisk -l /dev/loop2
Disk /dev/loop2: 512 MiB, 536870912 bytes, 1048576 sectors
Units: sectors of 1 * 512 = 512 bytes
Sector size (logical/physical): 512 bytes / 512 bytes
I/O size (minimum/optimal): 512 bytes / 512 bytes
The partition table is empty, as expected in this case. Another useful command would be:
root@test:~# mdadm --examine /dev/loop2
mdadm: No md superblock detected on /dev/loop2.
The command output tells us that the device is not used for RAID already. Later on we can use this command for intelligence before reassembling a RAID.
Now it is a good moment to wipe a device clean from the old data. It might prevent a data leak once a device is decommissioned or sent for a repair.
dd if=/dev/zero of=/dev/loop2 bs=1M conv=fsync
Use the pseudorandom source /dev/urandom instead of /dev/zero if you wish to gain some additional security on the physical level when a real device is used. Please, read a note below if you wish to erase the drive securely.
We go ahead now and create a Linux RAID partition on the device leaving some space non-partitioned to allow for TRIM operations.
Generally, SSD drives overprovision space already, so the discussion if this step is necessary and if yes, than how much to overprovision can hold.
The decision should depend on your type of hardware (more expensive devices tend to have more internal reserves, some SSDs tend to get slower when getting full) and your requirements (how reliable and fast shall the system be).
This is what Kingston writes about overprovisioning: link
Seagate writes too: link
Interestingly enough, the overprovisioned space might be a reason for a security problem once it is decommissioned by a controller: it remains occupied by old data and invisible to the OS at the same time. Using full disk encryption consistently will help avoiding this issue in the future.
A note on securely erasing an SSD
Actually, to overcome the controller and reach the decomissioned sector too, there is a way. It is described here basically. It boils down to using hdparm utility and issuing an ATA command to the drive (in case it supports it) to erase itself securely. I would use it once a drive having to do with sensitive information is about to be passed in untrusted hands. Since controllers are known to have bugs when it goes about security, I would combine the secure erase ATA command with a run of dd if=/dev/urandom to be sure.
Be sure to read the disclamiers on the page. Playing with ATA commands around security is known to brick drives. The only option left then is to burnd the drive and disolve it in acid (joke, please, do not do it).
Back to the partitioning:
In the example below I leave approximately 10% of the free space unpartioned, the first partition takes 450M out of 512M available on the disk.
root@test:~# fdisk /dev/loop2

Welcome to fdisk (util-linux 2.31.1).
Changes will remain in memory only, until you decide to write them.
Be careful before using the write command.

Device does not contain a recognized partition table.
Created a new DOS disklabel with disk identifier 0x8c5db23c.

Command (m for help): o   <--- create a new label
Created a new DOS disklabel with disk identifier 0x53ebea82.

Command (m for help): n          <--- create a new partition
Partition type
   p   primary (0 primary, 0 extended, 4 free)
   e   extended (container for logical partitions)
Select (default p):              <--- selected default

Using default response p.
Partition number (1-4, default 1):      <--- selected default
First sector (2048-1048575, default 2048):  <--- selected default
Last sector: +450M  <--- 450/512 megabytes

Created a new partition 1 of type 'Linux' and of size 450 MiB.

Command (m for help): t       <--- change partition type
Selected partition 1
Hex code (type L to list all codes): fd   <--- raid partition type
Changed type of partition 'Linux' to 'Linux raid autodetect'.

Command (m for help): w  <---- write changes
The partition table has been altered.
Calling ioctl() to re-read partition table.
Syncing disks.
If you have used losetup without the -P flag, run 'partprobe /dev/loopX' after fdisk to re-read the partition table. Replace X with the right number of the loop device.
Repeat partitioning on the other loop device.
We run lsblk to display the current device and partition configuration and ensure that loop2 and loop3 received the partitions.
root@test:~# lsblk
NAME                      MAJ:MIN RM  SIZE RO TYPE MOUNTPOINT
...

loop2                       7:2    0  512M  0 loop
└─loop2p1                 259:0    0  450M  0 loop
loop3                       7:3    0  512M  0 loop
└─loop3p1                 259:1    0  450M  0 loop
...
When setting up a non-virtual raid you will use sdb1- or nvme0n1p3-similar names of real devices instead of loop devices.
Let's enroll the partitions into a mirroring RAID.
Setting up the first RAID
The raid tool mdadm is already installed on 18.04. In case you need to install it on your OS:
sudo apt-get install mdadm
Now let's create a RAID 1 type of a device:
root@test:~# mdadm --create /dev/md0 --level=1 --raid-devices=2 /dev/loop2p1 /dev/loop3p1
mdadm: Note: this array has metadata at the start and
    may not be suitable as a boot device.  If you plan to
    store '/boot' on this device please ensure that
    your boot-loader understands md/v1.x metadata, or use
    --metadata=0.90
Continue creating array? y  <em><--- yes</em>
mdadm: Defaulting to version 1.2 metadata
mdadm: array /dev/md0 started.
The warning above is about the to-be-created raid. It is fine to continue creating the raid, this is exactly what we want.
For test purposes, let's write something to the newly created raid device and locate it on the raid components:
root@test:~# python3
Python 3.6.7 (default, Oct 22 2018, 11:32:17)
[GCC 8.2.0] on linux
Type "help", "copyright", "credits" or "license" for more information.

// Now in python:
f=open("/dev/md0", "wb")
f.write(b"Hello world")
11   <-- 11 bytes written
f.close()
Let's search the member partitions with grep for a match:
root@test:~/devfiles# grep "Hello world" /dev/loop2p1
Binary file /dev/loop2p1 matches
root@test:~/devfiles# grep "Hello world" /dev/loop3p1
Binary file /dev/loop3p1 matches
As both partitions are matching we confirm that the mirroring raid functionality is working. We have a functional RAID1 now.
Let's save the raid's configuration for the ease of the future assembly:
After a reboot it is possible to assemble the raid like this:
root@test:~#mdadm --assemble /dev/md0 /dev/loop2p1 /dev/loop3p1
For the automatic assembly on reboot we need to store the raid configuration from 'mdadm --detail' in the mdadm.conf.
root@test:~# mdadm --detail --scan
ARRAY /dev/md/0 metadata=1.2 name=test:0 UUID=c877e24b:9154d5f4:002aac90:e81a17fb
Carefully append it to mdadm.conf:
root@test:~# mdadm --detail --scan >> /etc/mdadm/mdadm.conf
Based on mdadm.conf the mdadm program will scan devices automatically and add them to the raid. To specify which devices have to be scanned we use the DEVICE directive in the mdadm.conf.
For example DEVICE /dev/loop*p* will add a scan for partitions on loop devices.
Here is the final mdadm.conf in my case:
# mdadm.conf
#
# !NB! Run update-initramfs -u after updating this file.
# !NB! This will ensure that initramfs has an uptodate copy.
#
# Please refer to mdadm.conf(5) for information about this file.
#

# by default (built-in), scan all partitions (/proc/partitions) and all
# containers for MD superblocks. alternatively, specify devices to scan, using
# wildcards if desired.
#DEVICE partitions containers

# automatically tag new arrays as belonging to the local system
HOMEHOST

# instruct the monitoring daemon where to send mail alerts
MAILADDR root

# definitions of existing MD arrays

# This configuration was auto-generated on Wed, 25 Jul 2018 23:01:52 +0000 by mkconf

DEVICE /dev/loop*p*
ARRAY /dev/md0 metadata=1.2 name=test:0 UUID=c877e24b:9154d5f4:002aac90:e81a17fb
Such configuration should survive a 'reboot' in case of real devices used (the loops do not survive a reboot). Try it, please.
Note: In the test scenario, after a reboot you have to setup the loop devices again and assemble the RAID:
cd ~/devfiles
losetup -fP sd1.img
losetup -fP sd2.img
mdadm --assemble --scan
Manual assemble command might be useful too:
mdadm --assemble /dev/md0 /dev/loop2p1 /dev/lopp3p1
For the flexibility in the future we go ahead and lay an LVM over the mdadm raid.
Adding an LVM Layer
LVM takes in a number of physical volumes, think devices, converts them into a volume group, think a pool of space, and then allows fragmenting the volume group into logical volumes which would usually host file systems finally.
LVM allows gaining certain degree of independence between the devices used and the resulting logical volumes. LVM also makes it possible in the future to add a device and grow a file system over multiple devices.
In our case individual physical devices will be raids themselves. Now we have a RAID 1 to add reliability to the LVM basis.
Note: LVM can do raids too but we use mdadm for it in this experiment.
Let's format md0 for LVM:
root@test:~/devfiles# fdisk /dev/md0

Welcome to fdisk (util-linux 2.31.1).
Changes will remain in memory only, until you decide to write them.
Be careful before using the write command.

Device does not contain a recognized partition table.
Created a new DOS disklabel with disk identifier 0x83b615aa.

Command (m for help): p
Disk /dev/md0: 449 MiB, 470810624 bytes, 919552 sectors
Units: sectors of 1 * 512 = 512 bytes
Sector size (logical/physical): 512 bytes / 512 bytes
I/O size (minimum/optimal): 512 bytes / 512 bytes
Disklabel type: dos
Disk identifier: 0x83b615aa

Command (m for help): o <--- new label
Created a new DOS disklabel with disk identifier 0x6e516a33.

Command (m for help): n  <--- new LVM partition
Partition type
   p   primary (0 primary, 0 extended, 4 free)
   e   extended (container for logical partitions)
Select (default p):  <--- default

Using default response p.
Partition number (1-4, default 1):  <--- default selected
First sector (2048-919551, default 2048):  <--- default selected
Last sector:  <--- default selected

Created a new partition 1 of type 'Linux' and of size 448 MiB.

Command (m for help): t  <--- change type
Selected partition 1
Hex code (type L to list all codes): 8e
Changed type of partition 'Linux' to 'Linux LVM'.

Command (m for help): w  <--- write changes
The partition table has been altered.
Calling ioctl() to re-read partition table.
Syncing disks.
A physical volume partition is created, let's create a physical volume with pvcreate:
root@test:~/devfiles# pvcreate /dev/md0p1
  Physical volume "/dev/md0p1" successfully created.
Our volume group, for now, will be rather trivial and will contain only one physical device. Later we will add more devices to it.
root@test:~# vgcreate vg-large-storage /dev/md0p1
  Volume group "vg-large-storage" successfully created
We called the volume group vg-large-storage to remind by the name that we are talking about a volume group. It could be renamed with vgrename to whatever you see fit.
Finally we create a logical volume, trivially again, just one.
Note: This is the point where one could configure LVM itself to do RAID modes for the logical volume. Our LVM lies on a raid already. Using a raid here again could create a raid of raids, e.g. for RAID10 in an unusual configuration.
Let's assume we will store backups on the logical volume and call it accordingly.
lvcreate -n lv-backup -l 100%FREE vg-large-storage
  Logical volume "lv-backup" created.
Note: we use all the free volume group space for the new logical volume. If you had many logical volumes, it would make sense to reserve some free space in the volume group in the case you have to extend one of the logical volumes later.
Let's check where we stand again running the following commands:
root@test:~# lsblk <--- show block devices
NAME

...

loop2
└─loop2p1
  └─md0
    └─md0p1
      └─vg--large--storage-lv--backup
loop3
└─loop3p1
  └─md0
    └─md0p1
      └─vg--large--storage-lv--backup

...

root@test:~# lvs  <--- logical volumes summary
  LV        VG               Attr       LSize   Pool Origin Data%  Meta%  Move Log Cpy%Sync Convert
  lv-backup vg-large-storage -wi-a----- 444.00m

root@test:~# pvs  <--- physical volumes summary
  PV         VG               Fmt  Attr PSize   PFree
  /dev/md0p1 vg-large-storage lvm2 a--  444.00m      0
It is time to add disk encryption to our logical volume.
Setting up LUKS
Cryptsetup is the required package here, again, it came with my Ubuntu 18.04, but here is how to install it anyway:
apt-get install cryptsetup
Please, setup LUKS on the logical volume:
root@test:~# cryptsetup luksFormat /dev/vg-large-storage/lv-backup

WARNING!
========
This will overwrite data on /dev/vg-large-storage/lv-backup irrevocably.

Are you sure? (Type uppercase yes): YES  <--- Double check the target above
Enter passphrase for /dev/vg-large-storage/lv-backup:   <--- your complex passphrase
Verify passphrase: <--- repeat the passphrase
Store the passphrase in your password wallet, e.g. in the LastPass.
Check that the setup performed well:
root@test:~# cryptsetup luksDump /dev/vg-large-storage/lv-backup
LUKS header information for /dev/vg-large-storage/lv-backup

Version:        1
Cipher name:    aes
Cipher mode:    xts-plain64
Hash spec:      sha256
Payload offset: 4096
MK bits:        256
MK digest:      d5 fa 28 f2 2c b9 60 54 eb 8f 2c 8b 7f 34 f0 e7 d6 cb 48 58
MK salt:        c8 68 4d b1 75 0e af 79 98 f0 1a bf 3c 49 c7 f9
                a9 36 b0 50 cc 1e 7a 50 ac cd 45 79 75 c2 d1 c3
MK iterations:  211066
UUID:           f76fe57a-4900-4018-9168-ae852fa3e9ab

Key Slot 0: ENABLED
        Iterations:             3377056
        Salt:                   a8 80 da d9 36 b8 ee 6c f7 78 77 00 c2 7d f1 88
                                0e 40 1f 65 59 16 3b c1 3b 4a 10 6d af d7 1c b8
        Key material offset:    8
        AF stripes:             4000
Key Slot 1: DISABLED
Key Slot 2: DISABLED
Key Slot 3: DISABLED
Key Slot 4: DISABLED
Key Slot 5: DISABLED
Key Slot 6: DISABLED
Key Slot 7: DISABLED
And then open the encrypted space:
root@test:~# cryptsetup luksOpen /dev/vg-large-storage/lv-backup secure-backup
Enter passphrase for /dev/vg-large-storage/lv-backup:
Here is the lsblk output:
NAME                                  MAJ:MIN RM  SIZE RO TYPE  MOUNTPOINT

loop2                                   7:2    0  512M  0 loop
└─loop2p1                             259:1    0  450M  0 loop
  └─md0                                 9:0    0  449M  0 raid1
    └─md0p1                           259:2    0  448M  0 md
      └─vg--large--storage-lv--backup 253:1    0  444M  0 lvm
        └─secure-backup               253:2    0  442M  0 crypt
loop3                                   7:3    0  512M  0 loop
└─loop3p1                             259:0    0  450M  0 loop
  └─md0                                 9:0    0  449M  0 raid1
    └─md0p1                           259:2    0  448M  0 md
      └─vg--large--storage-lv--backup 253:1    0  444M  0 lvm
        └─secure-backup               253:2    0  442M  0 crypt
Status shows that device is in rw mode and ready:
root@test:~# cryptsetup -v status secure-backup
/dev/mapper/secure-backup is active.
  type:    LUKS1
  cipher:  aes-xts-plain64
  keysize: 256 bits
  key location: dm-crypt
  device:  /dev/mapper/vg--large--storage-lv--backup
  sector size:  512
  offset:  4096 sectors
  size:    905216 sectors
  mode:    read/write
Command successful.
Before the file system is created on the encrypted device it is possible to randomize it with zeros. This step is not strictly necessary if you have done the urandom initialization of the individual devices in your raid as describe above. One more run however will not hurt, do it if you have some spare time left and wish "more security":
dd if=/dev/zero of=/dev/mapper/secure-backup bs=4M status=progress conv=fsync
An even more secure (and slower) version would be:
dd if=/dev/urandom of=/dev/mapper/secure-backup bs=4M status=progress conv=fsync
This is really for those who are afraid of NSA at least. They would probably also use /dev/random and send their CVs only on paper with a trusted agent who they know since 20 years at least :)
Finally let's put a file system on top of our pie.
BTRFS layer
Install btrfs-progs if you do not have them already, then:
root@test:~# mkfs.btrfs /dev/mapper/secure-backup
btrfs-progs v4.15.1
See http://btrfs.wiki.kernel.org for more information.

Label:              (null)
UUID:               da5799e0-e0f5-4613-821d-64b4d1bc5a39
Node size:          16384
Sector size:        4096
Filesystem size:    442.00MiB
Block group profiles:
  Data:             single            8.00MiB
  Metadata:         DUP              32.00MiB
  System:           DUP               8.00MiB
SSD detected:       no
Incompat features:  extref, skinny-metadata
Number of devices:  1
Devices:
   ID        SIZE  PATH
    1   442.00MiB  /dev/mapper/secure-backup
Let's mount the system and unmount it safely, closing everything.
root@test:~# cryptsetup luksOpen /dev/vg-large-storage/lv-backup secure-backup
cd ~
root@test:~# mkdir backup

root@test:~# mount /dev/mapper/secure-backup /root/backup/

root@test:~# df -h backup/
Filesystem                 Size  Used Avail Use% Mounted on
/dev/mapper/secure-backup  442M   17M  361M   5% /root/backup

root@test:~# mount | grep backup
/dev/mapper/secure-backup on /root/backup type btrfs (rw,relatime,space_cache,subvolid=5,subvol=/)
Closing looks like:
umount ~/backup
cryptsetup luksClose /dev/mapper/secure-backup
Btrfs allows making snapshots which is great for backups: linux.com article. There is also a great UI tool from OpenSUSE for it: snapper.io.
We create a file on our btrfs to see whether the file system layer works.
root@test:~/backup# echo "Hello world" > welcome.txt
root@test:~/backup# cat welcome.txt
Hello world
We continue below checking out various scenarios of the raid life.
Corrupted drive
Let's corrupt one of the images and try to reassemble the raid.
First, we will unmount everything top down:
umount /root/backup    # <-- unmount btrfs
cryptsetup luksClose /dev/mapper/secure-backup  # <-- close encryption
dmsetup remove vg--large--storage-lv--backup    #<-- 'unmount' volume group
mdadm --stop /dev/md0         #   <-- stop raid
losetup -d /dev/loop2; losetup -d /dev/loop3 #  <-- 'unmount' loop devices
We will simulate a scenario where all but first megabyte of the drive has been corrupted:
dd if=/dev/urandom of=/root/devfiles/sd2.img bs=1M seek=1 count=511
Let's now restart the stack step-by-step:
root@test:~# losetup -fP /root/devfiles/sd1.img ; losetup -fP /root/devfiles/sd2.img
root@test:~# mdadm --assemble --scan -v
mdadm: looking for devices for /dev/md0
mdadm: No super block found on /dev/loop3p1 (Expected magic a92b4efc, got c5619c08)
mdadm: no RAID superblock on /dev/loop3p1
mdadm: /dev/loop2p1 is identified as a member of /dev/md0, slot 0.
mdadm: no uptodate device for slot 1 of /dev/md0
mdadm: added /dev/loop2p1 to /dev/md0 as 0
mdadm: /dev/md0 has been started with 1 drive (out of 2).
So as you can see md got trouble starting the raid. Let's check its status in more details:
root@test:~# mdadm --detail /dev/md0
/dev/md0:
           Version : 1.2
     Creation Time : Wed Jan  2 14:49:13 2019
        Raid Level : raid1
        Array Size : 459776 (449.00 MiB 470.81 MB)
     Used Dev Size : 459776 (449.00 MiB 470.81 MB)
      Raid Devices : 2
     Total Devices : 1
       Persistence : Superblock is persistent

       Update Time : Thu Jan  3 10:48:45 2019
             State : clean, degraded   <--- degraded state
    Active Devices : 1
   Working Devices : 1
    Failed Devices : 0
     Spare Devices : 0

Consistency Policy : resync

              Name : test:0  (local to host test)
              UUID : c877e24b:9154d5f4:002aac90:e81a17fb
            Events : 45

    Number   Major   Minor   RaidDevice State
       0     259        0        0      active sync   /dev/loop2p1
       -       0        0        1      removed   <--- second device removed
root@test:~# cat /proc/mdstat
Personalities : [linear] [multipath] [raid0] [raid1] [raid6] [raid5] [raid4] [raid10]
md0 : active raid1 loop2p1[0]
      459776 blocks super 1.2 [2/1] [U_]

unused devices:
The state of the raid is degraded, there is only one device in the raid. Let's mount everything up to btrfs and see if we still have our welcome.txt in place.
root@test:~# cryptsetup luksOpen /dev/vg-large-storage/lv-backup secure-backup
Enter passphrase for /dev/vg-large-storage/lv-backup:
root@test:~# mount /dev/mapper/secure-backup /root/backup/
root@test:~# cat backup/welcome.txt
Hello world
Our system has just survived a "crash" of one drives just fine. Let's restore the raid clean state.
root@test:~# umount /root/backup   <-- unmount btrfs
root@test:~# cryptsetup luksClose /dev/mapper/secure-backup  <-- close encryption
root@test:~# dmsetup remove vg--large--storage-lv--backup    <-- 'unmount' volume group
We will simulate coming back with a new drive by deleting the sd2.img file and recreating everything from scratch on a new version of it.
Recreate the file and remount the loop device:
root@test:~# cd devfiles/
root@test:~/devfiles# rm -rf sd2.img
root@test:~/devfiles# dd if=/dev/urandom of=./sd2.img bs=1M count=512
512+0 records in
512+0 records out
536870912 bytes (537 MB, 512 MiB) copied, 4.10785 s, 131 MB/s
root@test:~/devfiles# losetup -d /dev/loop3
root@test:~/devfiles# losetup -fP ./sd2.img
The lsblk command shows the new loop3 device without partitions:
root@test:~/devfiles# lsblk
NAME                      MAJ:MIN RM  SIZE RO TYPE  MOUNTPOINT
...
loop2                       7:2    0  512M  0 loop
└─loop2p1                 259:0    0  450M  0 loop
  └─md0                     9:0    0  449M  0 raid1
    └─md0p1               259:2    0  448M  0 md
loop3                       7:3    0  512M  0 loop
...
Now we recreate the Linux Raid partition in there using 450 out 512 megabytes:
root@test:~/devfiles# fdisk /dev/loop3

Welcome to fdisk (util-linux 2.31.1).
Changes will remain in memory only, until you decide to write them.
Be careful before using the write command.

Device does not contain a recognized partition table.
Created a new DOS disklabel with disk identifier 0x463e992a.

Command (m for help): o <-- new label
Created a new DOS disklabel with disk identifier 0x350da9f1.

Command (m for help): n  <-- new partition
Partition type
   p   primary (0 primary, 0 extended, 4 free)
   e   extended (container for logical partitions)
Select (default p): <-- default

Using default response p.
Partition number (1-4, default 1): <-- default
First sector (2048-1048575, default 2048): <-- default
Last sector: +450M

Created a new partition 1 of type 'Linux' and of size 450 MiB.

Command (m for help): t <-- change type
Selected partition 1
Hex code (type L to list all codes): fd
Changed type of partition 'Linux' to 'Linux raid autodetect'.

Command (m for help): w  <-- write
The partition table has been altered.
Calling ioctl() to re-read partition table.
Syncing disks.
Now let's add it to md0 raid and check the status of it:
root@test:~# mdadm --add /dev/md0 /dev/loop3p1
mdadm: added /dev/loop3p1

root@test:~# mdadm --detail /dev/md0
/dev/md0:
           Version : 1.2
     Creation Time : Wed Jan  2 14:49:13 2019
        Raid Level : raid1
        Array Size : 459776 (449.00 MiB 470.81 MB)
     Used Dev Size : 459776 (449.00 MiB 470.81 MB)
      Raid Devices : 2
     Total Devices : 2
       Persistence : Superblock is persistent

       Update Time : Thu Jan  3 11:03:29 2019
             State : clean    <--- clean state!
    Active Devices : 2
   Working Devices : 2
    Failed Devices : 0
     Spare Devices : 0

Consistency Policy : resync

              Name : test:0  (local to host test)
              UUID : c877e24b:9154d5f4:002aac90:e81a17fb
            Events : 66

    Number   Major   Minor   RaidDevice State
       0     259        0        0      active sync   /dev/loop2p1
       2     259        1        1      active sync   /dev/loop3p1
As you can see the good raid state has been restored.
Corrupting entire device on a live RAID
Starting from a clean raid we will "corrupt" one device of it:
root@test:~# mdadm --detail /dev/md0
/dev/md0:
           Version : 1.2
     Creation Time : Wed Jan  2 14:49:13 2019
        Raid Level : raid1
        Array Size : 459776 (449.00 MiB 470.81 MB)
     Used Dev Size : 459776 (449.00 MiB 470.81 MB)
      Raid Devices : 2
     Total Devices : 2
       Persistence : Superblock is persistent

       Update Time : Thu Jan  3 11:03:29 2019
             State : clean
    Active Devices : 2
   Working Devices : 2
    Failed Devices : 0
     Spare Devices : 0

Consistency Policy : resync

              Name : test:0  (local to host test)
              UUID : c877e24b:9154d5f4:002aac90:e81a17fb
            Events : 66

    Number   Major   Minor   RaidDevice State
       0     259        0        0      active sync   /dev/loop2p1
       2     259        1        1      active sync   /dev/loop3p1
We will "corrupt" the whole device covering it with zeros:
root@test:~# dd if=/dev/zero of=/dev/loop3
dd: writing to '/dev/loop3': No space left on device
1048577+0 records in
1048576+0 records out
536870912 bytes (537 MB, 512 MiB) copied, 5.02464 s, 107 MB/s
The state of the raid remains clean:
``` root@test:~# mdadm --detail /dev/md0 /dev/md0: Version : 1.2 Creation Time : Wed Jan 2 14:49:13 2019 Raid Level : raid1 Array Size : 459776 (449.00 MiB 470.81 MB) Used Dev Size : 459776 (449.00 MiB 470.81 MB) Raid Devices : 2 Total Devices : 2 Persistence : Superblock is persistent
   Update Time : Thu Jan  3 11:03:29 2019
         State : clean
Active Devices : 2
Working Devices : 2 Failed Devices : 0 Spare Devices : 0
Consistency Policy : resync
          Name : test:0  (local to host test)
          UUID : c877e24b:9154d5f4:002aac90:e81a17fb
        Events : 66

Number   Major   Minor   RaidDevice State
   0     259        0        0      active sync   /dev/loop2p1
   2     259        1        1      active sync   /dev/loop3p1
```
This is a relatively dangerous situation. Now we have lost 50% of the information and the raid "has not noticed" a change. On a read attempt we might get into trouble as the raid "does not know" which one of the two devices contains correct information.
Writing will work however and will no notify us of the failure.
Let's make the raid busy by writing a large random file to the btrfs:
root@test:~/backup# dd if=/dev/urandom of=random.bin bs=1M count=400 status=progress
316669952 bytes (317 MB, 302 MiB) copied, 3 s, 105 MB/s
dd: error writing 'random.bin': No space left on device
362+0 records in
361+0 records out
378535936 bytes (379 MB, 361 MiB) copied, 3.9755 s, 95.2 MB/s
The raid comes into the active mode and restores consistency:
root@test:~# mdadm --detail /dev/md0
/dev/md0:
           Version : 1.2
     Creation Time : Wed Jan  2 14:49:13 2019
        Raid Level : raid1
        Array Size : 459776 (449.00 MiB 470.81 MB)
     Used Dev Size : 459776 (449.00 MiB 470.81 MB)
      Raid Devices : 2
     Total Devices : 2
       Persistence : Superblock is persistent

       Update Time : Thu Jan  3 11:13:20 2019
             State : active
    Active Devices : 2
   Working Devices : 2
    Failed Devices : 0
     Spare Devices : 0

Consistency Policy : resync

              Name : test:0  (local to host test)
              UUID : c877e24b:9154d5f4:002aac90:e81a17fb
            Events : 67

    Number   Major   Minor   RaidDevice State
       0     259        0        0      active sync   /dev/loop2p1
       2     259        1        1      active sync   /dev/loop3p1
Next we go to a new scenario, we've got a new bigger drive and want to grow our raid.
This is a very dangerous observation here. A system where raiding is separate from the file system does not know whether the files are ok or not. It does not track files' consistency and is malleable to bit rotting.
Constant scrubbing with a consistency-favoring file system like ZFS is a preferred solution in this drive corruption scenario.
See the article on wikipedia on RAID Weaknesses: link.
The example above should give you the idea: mdadm is useful in the case of a physical device loss, and is weak in the situation where a device is delivering back corrupted data.
Growing the raid, changing raid level
First we will "get" a new bigger drive for us.
root@test:~/devfiles# dd if=/dev/zero of=./sd3.img bs=1G count=1
1+0 records in
1+0 records out
1073741824 bytes (1.1 GB, 1.0 GiB) copied, 14.6892 s, 73.1 MB/s
Let's create a device for it and format the new drive:
root@test:~/devfiles# losetup -fP sd3.img

root@test:~/devfiles# losetup -a
/dev/loop1: [64768]:43272 (/var/lib/snapd/snaps/core_4917.snap)
/dev/loop4: [64768]:133764 (/root/devfiles/sd3.img)
/dev/loop2: [64768]:133783 (/root/devfiles/sd1.img)
/dev/loop0: [64768]:2382 (/var/lib/snapd/snaps/core_6130.snap)
/dev/loop3: [64768]:133745 (/root/devfiles/sd2.img)

root@test:~/devfiles# fdisk /dev/loop4

Welcome to fdisk (util-linux 2.31.1).
Changes will remain in memory only, until you decide to write them.
Be careful before using the write command.

Device does not contain a recognized partition table.
Created a new DOS disklabel with disk identifier 0xe78167f5.

Command (m for help): o
Created a new DOS disklabel with disk identifier 0xdba9922b.

Command (m for help): n
Partition type
   p   primary (0 primary, 0 extended, 4 free)
   e   extended (container for logical partitions)
Select (default p):

Using default response p.
Partition number (1-4, default 1):
First sector (2048-2097151, default 2048):
Last sector: +900M      <-- reserve 100M out of 1G

Created a new partition 1 of type 'Linux' and of size 900 MiB.

Command (m for help): t
Selected partition 1
Hex code (type L to list all codes): fd
Changed type of partition 'Linux' to 'Linux raid autodetect'.

Command (m for help): w
The partition table has been altered.
Calling ioctl() to re-read partition table.
Syncing disks.
Now let's grow the raid there:
#Level change

root@test:~/devfiles# mdadm --grow /dev/md0 --level=5
mdadm: level of /dev/md0 changed to raid5


root@test:~/devfiles# mdadm --detail
Personalities : [linear] [multipath] [raid0] [raid1] [raid6] [raid5] [raid4] [raid10]
md0 : active raid5 loop2p1[0] loop3p1[2] <--- notice the level change
      459776 blocks super 1.2 level 5, 64k chunk, algorithm 2 [2/2] [UU]

unused devices:


root@test:~/devfiles# mdadm --detail /dev/md0
/dev/md0:
           Version : 1.2
     Creation Time : Wed Jan  2 14:49:13 2019
        Raid Level : raid5  <--- notice the level change
        Array Size : 459776 (449.00 MiB 470.81 MB)
     Used Dev Size : 459776 (449.00 MiB 470.81 MB)
      Raid Devices : 2
     Total Devices : 2
       Persistence : Superblock is persistent

       Update Time : Thu Jan  3 11:45:05 2019
             State : clean
    Active Devices : 2
   Working Devices : 2
    Failed Devices : 0
     Spare Devices : 0

            Layout : left-symmetric
        Chunk Size : 64K

Consistency Policy : resync

              Name : test:0  (local to host test)
              UUID : c877e24b:9154d5f4:002aac90:e81a17fb
            Events : 67

    Number   Major   Minor   RaidDevice State
       0     259        0        0      active sync   /dev/loop2p1
       2     259        1        1      active sync   /dev/loop3p1


#Growing with one more device
root@test:~/devfiles# mdadm --grow /dev/md0 --add /dev/loop4p1 --raid-devices=3
mdadm: added /dev/loop4p1


root@test:~/devfiles# cat /proc/mdstat   <--- check reshaping state
Personalities : [linear] [multipath] [raid0] [raid1] [raid6] [raid5] [raid4] [raid10]
md0 : active raid5 loop4p1[3] loop2p1[0] loop3p1[2]
      459776 blocks super 1.2 level 5, 64k chunk, algorithm 2 [3/3] [UUU]
      [==>..................]  reshape = 12.4% (57408/459776) finish=0.3min speed=19136K/sec

unused devices:
Wait for the reshape to finish. After the reshaping, lsblk shows the new capacity of the md0 raid:
root@test:~# lsblk /dev/md0
NAME                              MAJ:MIN RM  SIZE RO TYPE  MOUNTPOINT
md0                                 9:0    0  898M  0 raid5
└─md0p1                           259:2    0  448M  0 md
  └─vg--large--storage-lv--backup 253:1    0  444M  0 lvm
    └─secure-backup               253:2    0  442M  0 crypt /root/backup
To make use of it we need to resize the mod0p1 partition, the physical volume of lvm, then the logical volume, luks and finally btrfs.
In the case of real devices and data on them this would be the time to backup.
Growing the partition first:
root@test:~# fdisk /dev/md0

Welcome to fdisk (util-linux 2.31.1).
Changes will remain in memory only, until you decide to write them.
Be careful before using the write command.


Command (m for help): p
Disk /dev/md0: 898 MiB, 941621248 bytes, 1839104 sectors
Units: sectors of 1 * 512 = 512 bytes
Sector size (logical/physical): 512 bytes / 512 bytes
I/O size (minimum/optimal): 65536 bytes / 65536 bytes
Disklabel type: dos
Disk identifier: 0x6e516a33

Device     Boot Start    End Sectors  Size Id Type
/dev/md0p1       2048 919551  917504  448M 8e Linux LVM

Command (m for help): d
Selected partition 1
Partition 1 has been deleted.

Command (m for help): n
Partition type
   p   primary (0 primary, 0 extended, 4 free)
   e   extended (container for logical partitions)
Select (default p):

Using default response p.
Partition number (1-4, default 1):
First sector (2048-1839103, default 2048): <-- should start exactly where the deleted partition started
Last sector:  <-- default would occupy the whole space

Created a new partition 1 of type 'Linux' and of size 897 MiB.
Partition #1 contains a LVM2_member signature.

Do you want to remove the signature? [Y]es/[N]o: N <-- keep the LVM signature

Command (m for help): w

The partition table has been altered.
Syncing disks.
Check up:
root@test:~# lsblk /dev/md0p1
NAME                            MAJ:MIN RM  SIZE RO TYPE  MOUNTPOINT
md0p1                           259:2    0  897M  0 md
└─vg--large--storage-lv--backup 253:1    0  444M  0 lvm
  └─secure-backup               253:2    0  442M  0 crypt /root/backup
Run "partprobe /dev/md0" if no changes are reflected.
Let's grow the physical and the logical volumes of LVM.
root@test:~# pvresize /dev/md0p1
  Physical volume "/dev/md0p1" changed
  1 physical volume(s) resized / 0 physical volume(s) not resized

root@test:~# lvresize -l +100%FREE /dev/vg-large-storage/lv-backup
  Size of logical volume vg-large-storage/lv-backup changed from 444.00 MiB (111 extents) to 896.00 MiB (224 extents).
  Logical volume vg-large-storage/lv-backup successfully resized.


root@test:~# lsblk /dev/md0p1
NAME                            MAJ:MIN RM  SIZE RO TYPE  MOUNTPOINT
md0p1                           259:2    0  897M  0 md
└─vg--large--storage-lv--backup 253:1    0  896M  0 lvm    <--- 896 MB versus 444 MB
  └─secure-backup               253:2    0  442M  0 crypt /root/backup
Time to resize the LUKS part.
root@test:~# cryptsetup resize secure-backup
root@test:~# lsblk /dev/md0p1
NAME                            MAJ:MIN RM  SIZE RO TYPE  MOUNTPOINT
md0p1                           259:2    0  897M  0 md
└─vg--large--storage-lv--backup 253:1    0  896M  0 lvm
  └─secure-backup               253:2    0  894M  0 crypt /root/backup   <--- 894 MB versus 442 MB
Notice, we do all of the upsizing on the live stack.
Time to resize btrfs.
root@test:~/backup# df -h /dev/mapper/secure-backup
Filesystem                 Size  Used Avail Use% Mounted on
/dev/mapper/secure-backup  442M  379M     0 100% /root/backup
In case of ext* file systems the resize2fs would work here to grow the file system. We need to use a BTRFS-specific command. It works on the mount point /root/backup and not on the mounted device.
Resizing BTRFS:
``` root@test:~# btrfs filesystem resize max /root/backup Resize '/root/backup' of 'max'
root@test:~# df -h /root/backup/ Filesystem Size Used Avail Use% Mounted on /dev/mapper/secure-backup 894M 379M 452M 46% /root/backup <-- growth ```
In the next scenario we go back to failing raid components and start the raid without one of the older devices. Assume it has failed on reboot.
Device missing, RAID 5
Note: before this exercise I have actually recreated my RAID 5 from scratch. Some of the outputs might differ slightly because of it.
To have some content in BTRFS for test purposes I create a random file and calculate a SHA256 hash of it with a check. Reverifying this checksum would reassure us that everything is working fine.
Note: Actually, in case of mdadm mistakes the cryptsetup luksOpen will fail first.
root@test:~# dd if=/dev/urandom of=random.bin bs=1M count=350
root@test:~# sha256sum random.bin >> random.bin.shasum
root@test:~# sha256sum -c random.bin.shasum
random.bin: OK
For this experiment we unmount everything up to loopback devices and then remove one of the loop devices.
Unmounting:
umount /root/backup    # <-- unmount btrfs
cryptsetup luksClose /dev/mapper/secure-backup  # <-- close encryption
dmsetup remove vg--large--storage-lv--backup    #<-- 'unmount' volume group
mdadm --stop /dev/md0         #   <-- stop raid
Device removal:
root@test:~# losetup
NAME       SIZELIMIT OFFSET AUTOCLEAR RO BACK-FILE                           DIO LOG-SEC
...
/dev/loop4         0      0         0  0 /root/devfiles/sd3.img                0     512
/dev/loop2         0      0         0  0 /root/devfiles/sd1.img                0     512
/dev/loop3         0      0         0  0 /root/devfiles/sd2.img                0     512

root@test:~# losetup -d /dev/loop2 #  <-- detach one of the older loop devices

root@test:~# losetup
NAME       SIZELIMIT OFFSET AUTOCLEAR RO BACK-FILE                           DIO LOG-SEC
...
/dev/loop4         0      0         0  0 /root/devfiles/sd3.img                0     512
/dev/loop3         0      0         0  0 /root/devfiles/sd2.img                0     512
We end up with the two (relevant) loop devices.
Let's restart the raid.
mdadm --assemble --scan
mdadm: /dev/md0 has been started with 2 drives (out of 3).
The raid is clean but degraded:
root@test:~# mddetail
/dev/md0:
           Version : 1.2
     Creation Time : Thu Jan  3 15:28:48 2019
        Raid Level : raid5
        Array Size : 917504 (896.00 MiB 939.52 MB)
     Used Dev Size : 458752 (448.00 MiB 469.76 MB)
      Raid Devices : 3
     Total Devices : 2    <--- only two out of three
       Persistence : Superblock is persistent

       Update Time : Thu Jan  3 15:39:41 2019
             State : clean, degraded    <--- degraded raid
    Active Devices : 2
   Working Devices : 2
    Failed Devices : 0
     Spare Devices : 0

            Layout : left-symmetric
        Chunk Size : 512K

Consistency Policy : resync

              Name : test:0  (local to host test)
              UUID : c98a3b4e:4e7bc64f:f7788330:7adcfb0c
            Events : 18

    Number   Major   Minor   RaidDevice State
       -       0        0        0      removed
       1     259        0        1      active sync   /dev/loop3p1
       3     259        2        2      active sync   /dev/loop4p1
Mounting everything back shows that everything works and is in place:
root@test:~# lsblk /dev/md0
NAME                              MAJ:MIN RM  SIZE RO TYPE  MOUNTPOINT
md0                                 9:0    0  896M  0 raid5
└─md0p1                           259:1    0  895M  0 md
  └─vg--large--storage-lv--backup 253:1    0  892M  0 lvm   <--- LVM volumes found

root@test:~# cryptsetup luksOpen /dev/vg-large-storage/lv-backup secure-backup
Enter passphrase for /dev/vg-large-storage/lv-backup:

root@test:~# mount /dev/mapper/secure-backup /root/backup/ <--- btrfs mounts well
root@test:~# cd backup/
root@test:~/backup# sha256sum -c random.bin.shasum
random.bin: OK   <--- the random file is ok
Degraded RAID5 still works fine.
Let's restore the raid now.
We create a new device and extend our (failed) raid to have three devices again. We will use sfdisk to recreate partitions same as on the last larger loop back device loop4.
root@test:~/devfiles# sfdisk -d /dev/loop4 | tee parttab
label: dos
label-id: 0x412624cb <-- change this to have a different label
device: /dev/loop4
unit: sectors

/dev/loop4p1 : start=        2048, size=     1843200, type=fd

nano parttab # I will use label id +1 - 0x412624cb

root@test:~/devfiles# cat parttab #check
label: dos
label-id: 0x412624cb
device: /dev/loop4
unit: sectors

/dev/loop4p1 : start=        2048, size=     1843200, type=fd


root@test:~/devfiles# losetup -P /dev/loop5 sd4.img  <-- new device loop5

root@test:~/devfiles# sfdisk /dev/loop5 <  parttab   <-- format
Now we will add the new device to the raid and check status:
root@test:~/devfiles# mdadm --add /dev/md0  /dev/loop5p1
mdadm: added /dev/loop5p1

root@test:~/devfiles# mdadm --detail /dev/md0
/dev/md0:
           Version : 1.2
     Creation Time : Thu Jan  3 15:28:48 2019
        Raid Level : raid5
        Array Size : 917504 (896.00 MiB 939.52 MB)
     Used Dev Size : 458752 (448.00 MiB 469.76 MB)
      Raid Devices : 3
     Total Devices : 3
       Persistence : Superblock is persistent

       Update Time : Thu Jan  3 16:08:12 2019
             State : clean   <-- it is clean again
    Active Devices : 3
   Working Devices : 3
    Failed Devices : 0
     Spare Devices : 0

            Layout : left-symmetric
        Chunk Size : 512K

Consistency Policy : resync

              Name : test:0  (local to host test)
              UUID : c98a3b4e:4e7bc64f:f7788330:7adcfb0c
            Events : 37

    Number   Major   Minor   RaidDevice State
       4     259        3        0      active sync   /dev/loop5p1
       1     259        0        1      active sync   /dev/loop3p1
       3     259        2        2      active sync   /dev/loop4p1
Once again, also in the case of RAID5, once a device is corrupted and inserted into the raid nevertheless, it is possible to cause data corruption on the file system level. As mdadm "does not know" which of the devices is right and which is wrong, it might sync from the failing device and overwrite the parity! It will destroy the data forever.
Try to corrupt one of the three disks with dd-ing urandom on loop5p1 partition for example, and see how the btrfs or luks will stop mounting or the hash check will fail for the file (depending on the dd seek option - you can leave headers, but destroy the actual data on the partition).
ZFS looks like a better choice overall in data corruption cases.
Thanks for reading my blog!
 molotnikov.de