OpenWRT and Linksys WRT54 upgrade tricks
Keeping your managed router up to date is essential for stability and security of it. Modern routers often feature Linux or FreeBSD installations which can be made to your powerful enemies unless taken under control.
I've got in my hands a rather old Linksys WRT54GS v1.1 wireless router with some outdated OpenWRT installed on it. Here I'll show what I have learned about OpenWRT and flashing tricks while updating this router to the newer OpenWRT version.
Disclaimer On this web site you might read about
or get access to various kinds of software and technology, including but not limited to libraries,
operating systems, software for communications, mobile phones and tablets,
Android software and Linux, even cars and motorcycles, security and penetration testing software,
software used in security research and forensics, some samples of software which can be
used (elsewhere) for malicious or illegal purposes. You will read about or be provided with
the ways to change it, to operate it and to use it. You might find advice and recommendations,
which are only an opinion, and not a legal advice or commercial recommendation..
Bear in mind, please, that everything you do, you do solely at your own risk
and responsibility. In no way the author of this web site, information, graphics
and other materials presented here or related to it can be made liable or
anyhow else responsible for your own actions as well as
actions of any third party and their direct or indirect results or consequences
with or without the use of this information as well as the software,
technology and systems mentioned and/or presented here,
no matter if developed by the author or by any third party.
In no way it is guaranteed that you will meet any suitability for
any particular purpose, safety, security, legality or even simply
functioning of the software and systems described here. You have to make
sure each time yourself, whether what you do, is really what you intend to
do, and that you are ready to be yourself responsible for. All the recommendations
and experiences described here are the opinions of corresponding authors and
are to be taken with care and own full responsibility.
The software provided
on or through this web site, linked to from this web site or anyhow else
related to this web site is provided by the corresponding authors on their
own terms. We provide all the software here as is without any guarantees to you.
You are responsible for deciding whether it is suitable for you or not.
You are also responsible for all direct or indirect consequences of using this
software.
Other web sites linked to from the current one are out of the author's control,
we can not guarantee anything about their content, its quality or even legality. We
can not be liable for any use of the linked to web sites or of the information presented there.
We reasonably try to keep this website running smoothly and to deliver
information to the best of our knowledge corresponding to the state of the art at the times
when the information is composed, usually presented together with the information, and out of good intents.
We can not however guarantee and can not be liable for this website being temporarily or permanently
unavailable, presenting unreliable information or software, or any other similar or not malfunctioning
or functioning not up to your expectations as well as any consequences
which might result from this site's operation.
Linksys WRT54GS v1.1
This is what I got in my hands:
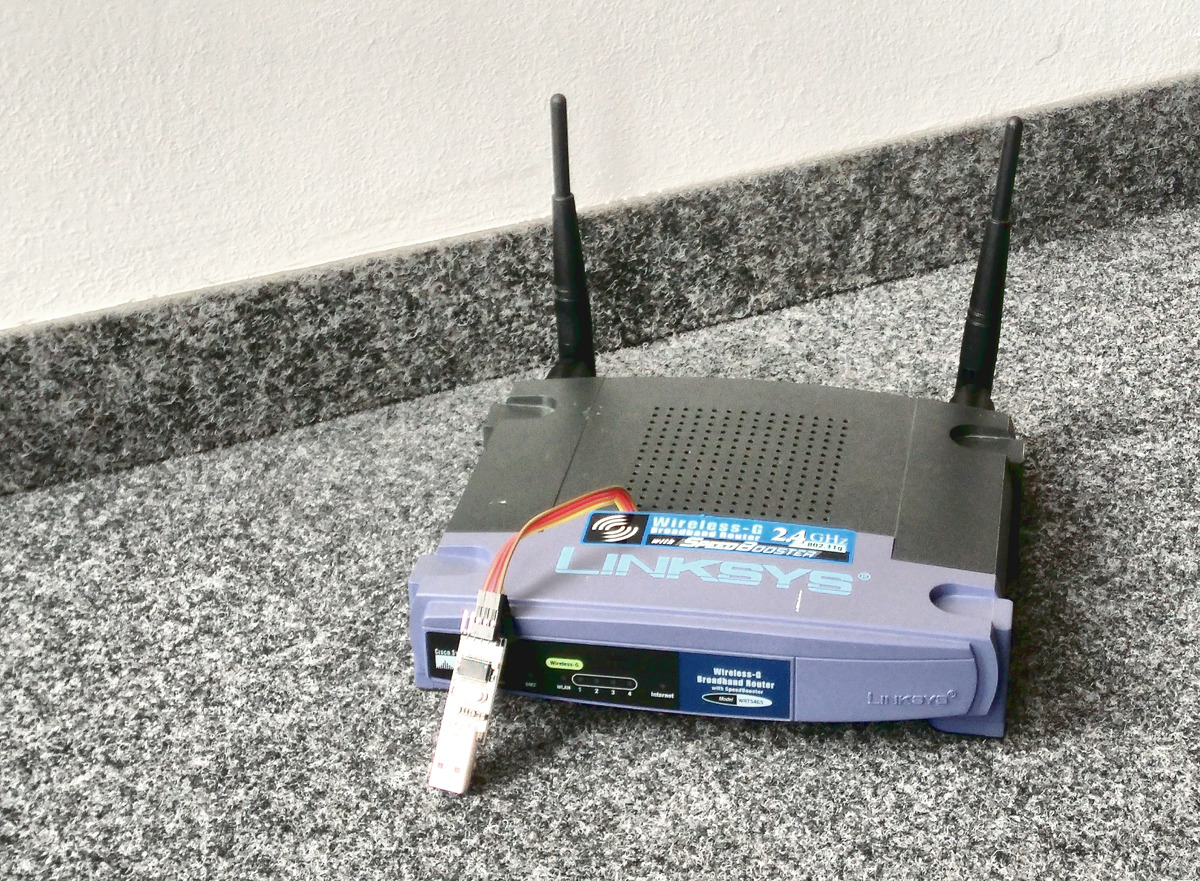 Linksys WRT54GS v1.1
This article, however, will contain a lot of information, which might also be relevant to other WRT routers, and generally OpenWRT devices. It has sections in it covering different tricks I had to go through while upgrading this router to a newer OpenWRT with LuCi UI.
Serial console and failsafe mode
I can't stress enough, how useful it was to have a serial console connection in the update process. Often the instructions on booting into Failsafe mode just simply did not work reliably.
How to connect Linksys Router to Serial Console?
OpenWRT works perfectly with the serial console and lets you boot into failsafe mode without problems.
For the serial console access I had an 8 Euro adapter with cables. Look for PL2303 USB RS232 in the shop.
This is how it is connected to the router.
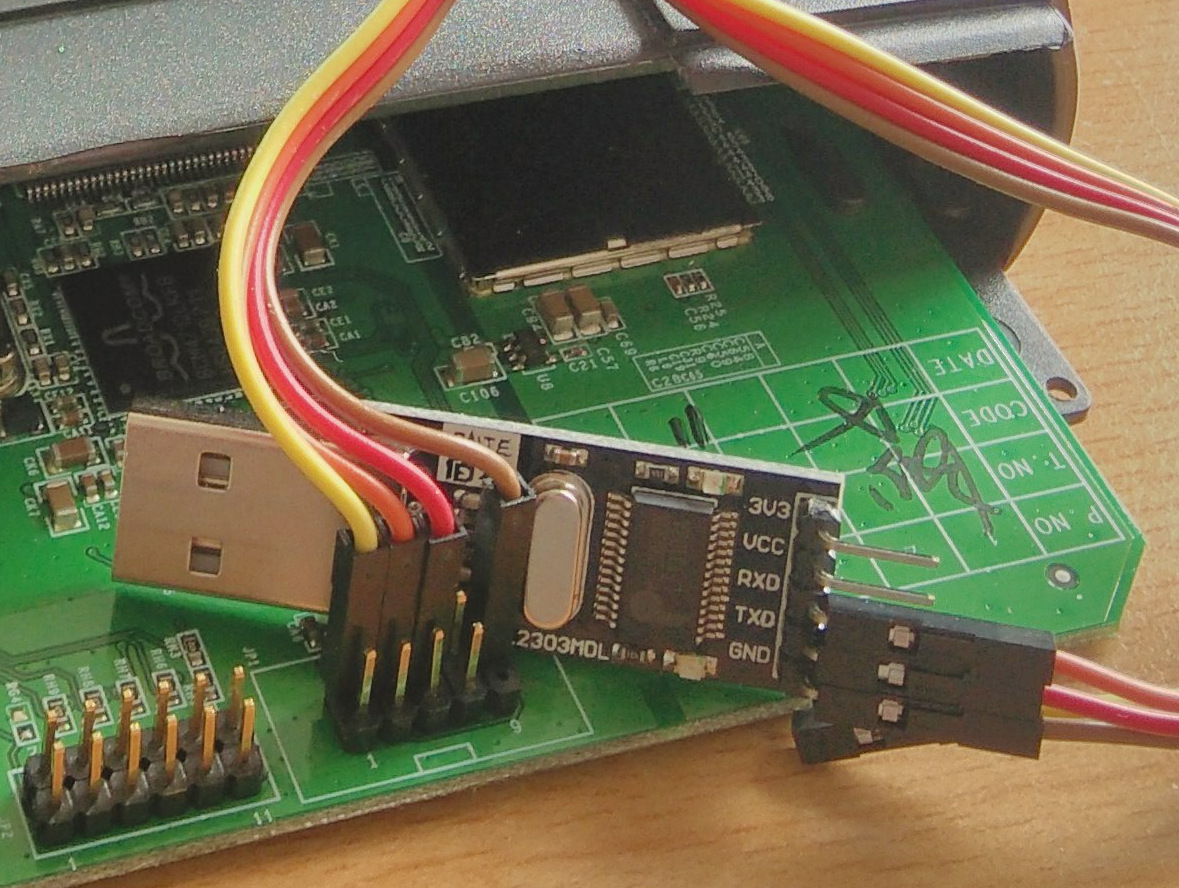 USB PL2303 RS232
 Pay attention to the yellow VCC cable - it is not connected to the converter. The converter gets its current from the laptop!
The USB-end goes into my Linux laptop, where minicom is installed:
sudo apt-get install minicom
Connect the USB-end now and find a new tty device connected.:
dmesg  |  grep tty
..
[10016.788473] usb 1-1: pl2303 converter now attached to ttyUSB0
..
Notice the ttyUSB0 device name and start minicom with -s option.
sudo minicom -s
How to make minicom work with OpenWRT and Linksys router?
In the serial port setup specify the device name and switch off the hardware flow control:
A - Serial Device  :  /dev/ttyUSB0
F - Hardware Flow Control : No
Then select Save setup as dfl proceeding to Exit to enter the console. Now you can boot the router.
The failsafe mode in OpenWRT is turned on when you select 'f' and press Enter once the prompt appears for it.
..
Press the [f] key and hit [enter] to enter failsafe mode
Press the [1], [2], [3] or [4] key and hit [enter] to select the debug level
     -- Press f and Enter here.
Reseting OpenWRT to Factory Defaults
Now from the failsafe you can go for factory defaults with.
mount_root; firstboot; reboot
How to reset OpenWRT password?
From there you can also do mount_root; passwd root - to set a new root password,
which might be useful if you have a UI
access to the old router but do not know its password anymore.
In my case I had a version of OpenWRT without the LuCi GUI. I had to update from the console.
But before that, we need to setup our Linux machine to network with the router.
Network configuration on the Linux Laptop
In my case, it is an Ubuntu laptop. It is done in a similar fashion with other distributions.
How to connect Ubuntu to OpenWRT?
We need to set up a static IP address on your Ethernet NIC and configure the routing. I also put down my other NICs and virtual NICs for the sake of simplicity.
sudo service network-manager stop
sudo ifconfig virbr0 down
sudo ifconfig virbr1 down # cu VirtManager
...
sudo ifconfig docker0 down # ciao docker
sudo ifconfig wlp3s0 down # my WiFi adapter
Check it with ifconfig to find your Ethernet NIC name:
ifconfig
   enp0s31f6 Link encap:Ethernet  HWaddr c8:5b:7...
it is enp0s31f6 in my case.
Connect a patch cable to the port 1 of the router and to your NIC on the laptop.
Let's set some variables and commands:
dev=enp0s31f6
selfaddr=192.168.1.2
selfnm=24
selffulladdr="$selfaddr/$selfnm"
devaddr=192.168.1.1
net=192.168.1.0
netmask=255.255.255.0

alias ro='route -nv'
alias u='sudo ifconfig $dev up'
alias d='sudo ifconfig $dev down'
alias ic='ifconfig $dev'
alias ar='sudo ip route add $devaddr/32 dev $dev'
alias aa='sudo ip addr add $selffulladdr dev $dev'
alias pd='ping -c 3 $devaddr'
alias tn='telnet $devaddr'
alias reconf='d; u; aa; ar; ic; ro; pd'
alias ff='firefox http://$devaddr:80/'
Now let's use them:
d       # puts interface down
u       # brings it up without IP configuration
aa      # adds a static IP to it
ar      # adds the route to the router on the NIC
ic; ro; # verify the configuration
pd      # shall ping the device, if it does not, you have a problem
tn      # telnet to the router
ff      # access Web UI
Now you shall be able to telnet to the router, let's get a new firmware image to install on the router.
How to upgrade OpenWRT from console or telnet?
Getting and converting a firmware image
I got mine from here: https://archive.openwrt.org/chaos_calmer/15.05/brcm47xx/legacy/
It is this one in the bin format.
Basically make sure you check you Exact router version and hardware version of it on the label on the bottom of the router. Then google for OpenWRT wrt54gs v1.1 using your versions of course. And you'll land on a page like this with the right links to the new image: https://wiki.openwrt.org/toh/hwdata/linksys/linksys_wrt54gs
Sysupgrade utility can upgrade the OpenWRT from the console.
Before that we need to convert the image to the trx format expected by older sysupgrade versions. They do not work with bin images producing an error: trx header not found. Do not proceed flashing the bin image, convert it first.
OpenWRT - convert bin to trx image
This is how you do it skipping the first 32 bytes:
dd if=openwrt-15.05-brcm47xx-legacy-linksys-wrt54gs-squashfs.bin bs=32 skip=1 of=openwrt-15.05-brcm47xx-legacy-linksys-wrt54gs-squashfs.trx
Check that the new image starts with HDR0:
hd openwrt-15.05-brcm47xx-legacy-linksys-wrt54gs-squashfs.trx | head -n 1
00000000  48 44 52 30 00 10 3a 00  ca 07 46 af 00 00 01 00    | HDR0..:...F.....|
Compare the size difference between the bin and trx files to double check with ls -l and checking the sizes in bytes.
How to upload an image to OpenWRT router?
Prepare the upload on the laptop with nc:
netcat -nlvp 1234 < openwrt-15.05-brcm47xx-legacy-linksys-wrt54gs-squashfs.trx
Then on the router go and download it to /tmp, again with the reduced nc variant in the router's busy box:
cd /tmp
nc 192.168.1.2 1234 > openwrt-15.05-brcm47xx-legacy-linksys-wrt54gs-squashfs.trx
Once the transfer is done, please, perform md5sum on both boxes and compare the checksums for the trx files. They must match on the laptop and on the router.
Updating OpenWRT from sysupgrade
Everything is ready for an upgrade now.
After the download run:
sysupgrade -v openwrt-15.05-brcm47xx-legacy-linksys-wrt54gs-squashfs.trx
And after a while, your router will reboot to the new OpenWRT installation. Don't forget to set a secure password in the LuCi after it.
You can use ff now to connect to it. First, keep the password empty, then set your desired password in the UI by clicking the "Go to password configuration" link, typing a new secure password twice and clicking Save and Apply after that (and not Enter!).
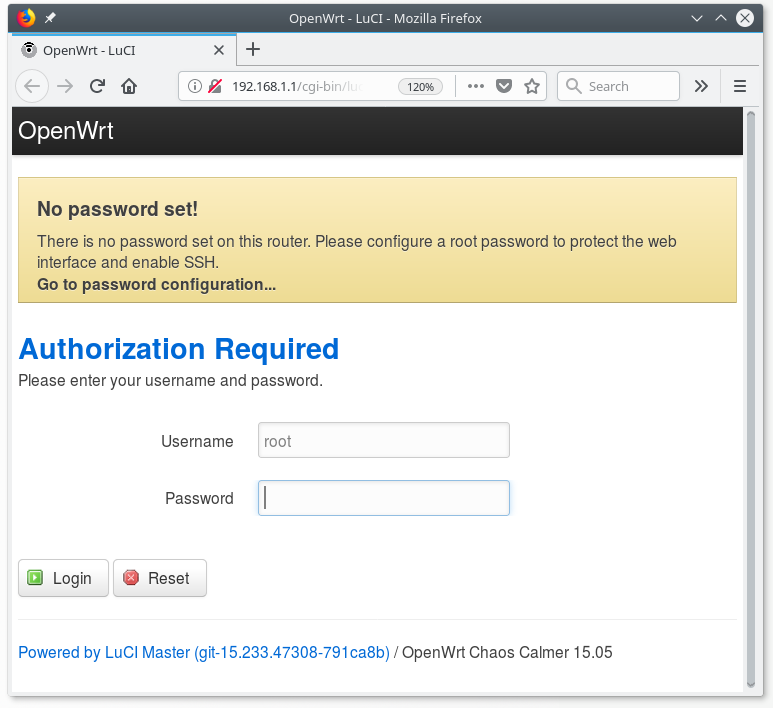 LuCI OpenWRT WebUI
That is it. I hope this article could save you some hassle.
Oh, to bring your normal networking up and running again call sudo service network-manager start.
Thanks for reading my blog!
 molotnikov.de