Setting up Security VLab
Here I describe how to create a pentesting or security research virtual laboratory on your own laptop. Using it you can master your pentesting skills and stay reasonably secure yourself when you do it.
Security of the lab is important, because a lab typically contains either vulnerable software or malicious software. You want to isolate your machine and network reasonably from the lab. It also can be that a system you test is both vulnerable and malicious, but you do not know about it yet.
Disclaimer On this web site you might read about
or get access to various kinds of software and technology, including but not limited to libraries,
operating systems, software for communications, mobile phones and tablets,
Android software and Linux, even cars and motorcycles, security and penetration testing software,
software used in security research and forensics, some samples of software which can be
used (elsewhere) for malicious or illegal purposes. You will read about or be provided with
the ways to change it, to operate it and to use it. You might find advice and recommendations,
which are only an opinion, and not a legal advice or commercial recommendation..
Bear in mind, please, that everything you do, you do solely at your own risk
and responsibility. In no way the author of this web site, information, graphics
and other materials presented here or related to it can be made liable or
anyhow else responsible for your own actions as well as
actions of any third party and their direct or indirect results or consequences
with or without the use of this information as well as the software,
technology and systems mentioned and/or presented here,
no matter if developed by the author or by any third party.
In no way it is guaranteed that you will meet any suitability for
any particular purpose, safety, security, legality or even simply
functioning of the software and systems described here. You have to make
sure each time yourself, whether what you do, is really what you intend to
do, and that you are ready to be yourself responsible for. All the recommendations
and experiences described here are the opinions of corresponding authors and
are to be taken with care and own full responsibility.
The software provided
on or through this web site, linked to from this web site or anyhow else
related to this web site is provided by the corresponding authors on their
own terms. We provide all the software here as is without any guarantees to you.
You are responsible for deciding whether it is suitable for you or not.
You are also responsible for all direct or indirect consequences of using this
software.
Other web sites linked to from the current one are out of the author's control,
we can not guarantee anything about their content, its quality or even legality. We
can not be liable for any use of the linked to web sites or of the information presented there.
We reasonably try to keep this website running smoothly and to deliver
information to the best of our knowledge corresponding to the state of the art at the times
when the information is composed, usually presented together with the information, and out of good intents.
We can not however guarantee and can not be liable for this website being temporarily or permanently
unavailable, presenting unreliable information or software, or any other similar or not malfunctioning
or functioning not up to your expectations as well as any consequences
which might result from this site's operation.
This article is brought to you in the shape of a manual. It is a bit boring to read I guess, but contains all the steps you need to set up the vlab. Below we consider a case of a pentesting environment with a virtual machine image taken from vulnhub.
We give concrete instructions below to setup Quaoar vulnerable machine from Canadian Hackfest 2016.
Steps.
Step 0. Install KVM and virt-manager (we assume Ubuntu).
sudo apt-get install qemu-kvm
# check it
lsmod | grep kvm
# Install virt-manager
sudo apt-get install virt-manager
# try it
virt-manager
Step 1. Create a separated network
In virt-manager click
Edit - Connection details
select the Virtual Networks tab, and click + to add a new network.
Name it so that you can distinguish it easily later. I named it webhack01.
In the IPv4 settings, configure address space: 192.168.0.0/24 and enable DHCPv4 to be in range
192.168.0.100 to 192.168.0.200
Note: This address space depends on the settings of your vulnerable machine.
The one used below wants to have 192.168.0.190, so we defined the network accordingly.
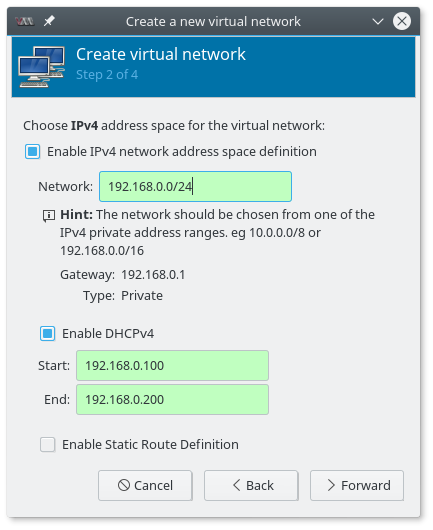
Select the type to be (o) Isolated virtual network.
Step 2. Get a machine from the vulnhub
e.g. this one: https://www.vulnhub.com/entry/hackfest2016-quaoar,180/
Step 3. Extract the .ova file to import into KVM
tar -xvf Quaoar.ovaStep 4. Convert it to qcow2
qemu-img convert -O qcow2 Quaoar-1.2-disk1.vmdk Quaoar-1.2.qcow2Step 5. Import to virt manager
File - New Virtual Machine
then
Import existing image
Next, find the image and import it.
Browse - Browse local - navigate, select the qcow2 file.
You can also select OS type Linux - Ubuntu 10.10 - for example.
IMPORTANT: do not blindly click on the Forward without reading the settings!
See the next step:
Step 6. Configure name and networking
On the tab where you give a name to the new machine (can be anything you like), please, click on the "Network election" and select the webhack01 network we created in the step 1.
Step 7. Getting Kali
The VM can now be booted into. We need however still a Pentester's machine. Let's get an ISO and install a new VM with it. URL is taken from here: https://www.kali.org/downloads/
wget http://cdimage.kali.org/kali-2017.1/kali-linux-2017.1-amd64.isoStep 8. Installing Kali
Create a new VM from the ISO, follow Kali Linux installation instructions.
Step 9. Configuring VM
We need to connect the kali to the target machine. For this got to settings page of the machine, and add a new NIC there.
Add Hardware - Network - Select webhack01 network.
You another network card might be a NAT card configured by default.
Step 10. Fin
You should be able now to reach form Kali the target machine and start hacking!
Note on Security
So where was the security of it all?
We have isolated a potentially malicious machine from our network by creating an isolated network and letting it interract with Kali only.
Of-course, if your Kali is vulnerable, e.g. has ssh access enabled with a weak password, things might still go south for you.
Images copyright information
The screen-shots on this page were taken by me.You are allowed to reproduce them for legal purposes given a link to this article as to the source.
Thanks for reading my blog!
 molotnikov.de